User
Document of jttt - "Java TCP Tunneling
Tool" version 1.0 beta
Date:
Developers
(user names in sourceforge.net)
Jeffkorn
jiechau
Outlines:
1.
What is jttt?
2.
System Requirement
3.
How to Install
4.
How to Run
5.
Known Bugs and Faults
6.
The License Comments
7.
Contact Us
1.
What is jttt?
"Java TCP Tunneling Tool" is
meant to construct a network mechanism to extend the usage of most TCP services
between Firewalls. For example, you have a Server (running web server) and a
Client, both resided inside their own firewalls, then
you can use an Intermediate Machine and run jttt on
all these 3 machines to build the tunnels, to let the Client open web pages
from the Server. Illustrate with:
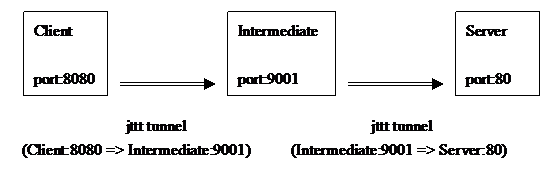
Originally we use "http://Server:80/"
to open the web pages. Since The Server is resided inside firewall, we use jttt and an Intermediate Machine to patch the connection.
Now you use http://localhost:8080/ to open the remote web pages.
2.
System Requirement
Firstly because this is a beta
version, it can be executed on a limited environment. The requirement for
Client, Server, and Intermediate Machine are:
For the Client Machine:
(1).Operating System: OS
Independent
(2).Having J2SE (Java 2 SDK,
Standard Edition) 1.4 or above installed.
For the Server Machine:
(1).Operating System: OS
Independent
(2).Having J2SE (Java 2 SDK,
Standard Edition) 1.4 or above installed.
For the Intermediate Machine:
(1).Operating System:
UNIX-based OS (because we would use Shell Script)
(2).Having J2SE (Java 2 SDK,
Standard Edition) 1.4 or above installed.
(3).Having SSH Server (sshd) installed, and SHOULD be a "SSH Secure
Shell".
[P.S.] Here the "SSH Secure
Shell" is the SSH Communication Security's
official release (implementation) of Secure Shell. (Please reference: http://www.ssh.com).
Currently jttt doesn't support any other SSH Server (sshd), e.g. OpenSSH. But to let jttt have the ability to support OpenSSH
is always our goal. In the next release of jttt we
will extend its ability to support OpenSSH.
(4).The SSH Server should be
running Secure Shell Protocol version 2.
(5).You need a "user account" in the Intermediate Machine.
(No need to have root or administrator account)
Make sure your environments meet all the
requirements above, then you could continue the
installation procedure.
3.
How to Install
The installation only needs you to unpack
this package, and modify some settings in some scripts:
For the Client Machine:
(1).Download the jttt release package, and unpack it to your installed directory,
let's call it $INSTALL_DIR. This way you would have the directory structure
looks like this, then it's correct:
$INSTALL_DIR/bin
$INSTALL_DIR/lib
$INSTALL_DIR/data
(2).Later we will
run the program under $INSTALL_DIR/bin, and that's all we need for the Client
Machine.
For the Server Machine:
(the
same installation procedure as the Client Machine)
For the Intermediate Machine:
(1).Download the jttt release package, and unpack it to your installed directory,
let's call it $INSTALL_DIR. This way you would have the directory structure
looks like this, then it's correct:
$INSTALL_DIR/bin
$INSTALL_DIR/lib
$INSTALL_DIR/data
(2).Edit 2 files:
Edit $INSTALL_DIR/bin/keepAlive.sh:
In "keepAlive.sh",
you should edit the very first line to indicate the Shell to execute this
script. Currently we use KornShell 93. (#!/home/unixtool/bin/ksh in our
test system). You could assign the correct path to your own Shell, any Shell
would be ok. Then you should edit these 2 variables to meet your system
setting:
sHomeDir= <set to your
$INSTALL_DIR>
JAVA_HOME= <set to your
JAVA installed directory>
For example, if you unpack the jttt package to /home/jch280/jttt (your
$INSTALL_DIR=/home/jch280/jttt) and your JDK is installed in /opt/java, then
these 2 lines would looks like this:
sHomeDir=/home/jch280/jttt
JAVA_HOME=/opt/java
Edit $INSTALL_DIR/bin/check.sh:
In "check.sh",
you should edit the very first line to indicate the Shell to execute this
script. Currently we use KornShell 93. (#!/home/unixtool/bin/ksh in our
test system). You could assign the correct path to your own Shell, any Shell
would be ok. Then you should edit these 2 variables to meet your system
setting:
sHomeDir= <set to your
$INSTALL_DIR>
sAuthorizationFile= <set to your SSH Public
Key authorization file>
For example, if you unpack the jttt package to /home/jch280/jttt (your
$INSTALL_DIR=/home/jch280/jttt) and your SSH Public
Key authorization file is /home/jch280/.ssh2/authorization, then these 2 lines
would looks like this:
sHomeDir=/home/jch280/jttt
sAuthorizationFile=/home/jch280/.ssh2/authorization
About the authorization file, by default
every user account in the system will have the authorization file in the
default location: "~/.ssh2/authorization". This file is used for the
Public Key Authentication method in SSH2 protocol. For more information, you
could reference:
http://www.ssh.com/support/documentation/online/ssh/adminguide/30/Public-Key_Authentication-2.html
http://www.ssh.com/support/documentation/online/ssh/winhelp/32/manually_editing_the_authorization_file.html
(3).Finally, don't forget to make these
.sh files as 'executable' by owner (chmod)
4.
How to Run
Run jttt in
Client, Server and Intermediate Machine, and you can achieve the tunneling
function. Here we use an example with configuration to explain how to run jttt.
Firstly, you should run jttt in the Intermediate Machine:
(1).Assume you
have an account 'jch280' in the Intermediate Machine, and the Intermediate
Machine's hostname is sparky.cs.nyu.edu. The jttt is
installed in /home/jch280/jttt (your $INSTALL_DIR) and the SSH Server is
running, with your own Public Key authorization file in
/home/jch280/.ssh2/authorization
(2).Configure the
$INSTALL_DIR/data/password.txt file by manually editing it. (in
this example: /home/jch280/data/password.txt) This file contains username:password pairs for using
the jttt system, the format is: every single line
contains an username:password pair. no comments, no spaces allowed. For example:
jie:xxxxxx
jlk:yyyyyy
This means you have 2 jttt
users: user "jie" has password "xxxxxx", and the second user "jlk"
has password "yyyyyy". You can add your own
user:pass. In the later
examples, we will continue use this 2 jttt user:pass pair.
(3).go to $INSTALL_DIR/bin
directory (in this example: /home/jch280/jttt/bin)
(4).run Intermediate with the
following 3 arguments:
% java -classpath
jttt.jar Intermediate <service_port>
<jttt_install_dir>
<ssh2_authorization_file>
The <service_port>
is a TCP port to listen on, for the Client and Server to connect to the
Intermediate Machine. You can choose any port number other then 9001~9100
(these 100 ports are reserved in jttt programs). Here
we use port 9000 as example. It would be:
% java -classpath
jttt.jar Intermediate 9000 /home/jch280/jttt \
/home/jch280/.ssh2/authorization
(4).When the first
time you run it, it will generate the key files. When you see the running
message stops, it means that the Intermediate is set up and ready.
(5).Later when you
start the jttt in Server and Client Machine, you
could run the shell script $INSTALL_DIR/bin/check.sh
in Intermediate Machine from time to time, to monitor the connection from
Server Machines.
Secondly, you should run jttt in the Server Machine:
(1).Running jttt on Server Machine is done by first switching to the directory
$INSTALL_DIR/bin
(2).Run JTTT with the
following 8 arguments:
% java -classpath
jttt.jar JTTT <Intermediate_hostname/ip>
<Intermediate_listening_port> <jttt_username> <jttt_password>
<user_account_on_Intermediate> <forward_method> <local_port_to_forward>
<comment_string>
Intermediate_hostname/ip: Hostname or IP Address of
Intermediate Machine,
here it is sparky.cs.nyu.edu
Intermediate_listening_port: the port listening for jttt connection,
here it is 9000 (because we configure it to 9000 when we run the program
in Intermediate Machine)
jttt_username: username in Intermediate
Machine password.txt file, here it is "jie"
jttt_password: password in Intermediate
Machine password.txt file, here it is "xxxxxx"
user_account_on_Intermediate: here it is
"jch280"
forward_method: The Port Forwarding
methods in SSH, its value is either "Remote" or "Local". In
the Server machine you SHOULD use only "Remote". Notice that you
should key-in exactly "Remote" ("R" is in upper case, with
all other letters in lower case).
local_port_to_forward: The TCP port you want to
forward in the Server. For example, if you want to forward the web server, then
it's "80". Notice that if you forward a TCP service which listening
on a port lower than 1024, then you should make sure you have the privilege to bypass
the security restriction.
comment_string: Given a comment string. This
is used for the Client side to tell apart from different services. (The case
is, you might run as many jttt instances using a same
user:pass pair). Here we use
the string "my_web" as example.
In our example, the command
executing in Server would be like this:
% java -classpath
jttt.jar JTTT sparky.cs.nyu.edu 9000 jie xxxxxx jch280 \
Remote 80 "my_web"
Finally, you could run jttt in the Client Machine now:
(1).Running jttt
on Server Machine is done by first switching to the directory
$INSTALL_DIR/bin
(2).Run JTTT with
the following 8 arguments, the first 5 arguements are
the same as the Server Machine, only the last 3 differ:
% java -classpath
jttt.jar JTTT <Intermediate_hostname/ip>
<Intermediate_listening_port> <jttt_username> <jttt_password>
<user_account_on_Intermediate> <forward_method> <local_port_to_forward>
<comment_string>
Intermediate_hostname/ip: (the same as Server part)
Intermediate_listening_port: (the same as Server part)
jttt_username: (the same as Server part)
jttt_password: (the same as Server part)
user_account_on_Intermediate: (the same as Server part)
forward_method: The Port Forwarding
methods in SSH, its value is either "Remote" or "Local". In
the Client machine you SHOULD use only "Local". Notice that you
should key-in exactly "Local" ("L" is in upper case, with
all other letters in lower case).
local_port_to_forward: Give a port to launch the forwardign service in the Client Machine. You can choose a
free port in the Client machine (a port number which is not currently blocked
by any application running on Client Machine). Later the TCP service would be
forward to this port in the Client Machine.
comment_string: Given a comment string. In
the Client machine, you could input "client" here.
In our example, the command
executing in Client would be like this:
% java -classpath
jttt.jar JTTT sparky.cs.nyu.edu 9000 jie xxxxxx jch280 \
Local 8080 "client"
During the execution, you'll be prompt
asked to input a port number. You should follow the appearing message to key-in
a correct port number. For example, if you see this message as follows, then
you should key-in 9001 (and enter) only.
choose from: "(9001:my_web),
" -- please keyin only the ……
9001
(3).Now in the
Client machine, you could open a web browser to test the connection, by open
the URL "http://localhost:8080/"
5.
Known Bugs and Faults
Known Bugs:
(1).Once the jttt program dies (in Client, Server, or Intermediate
Machine) then it won't restart automatically. You should manually restart it.
(2).Any jttt program dying in Client, Server, or Intermediate
Machine will cause the whole mechanism to fail. You should manually restart it.
(3).jttt only support "SSH Secure Shell" Server
(http://www.ssh.com) now. It doesn't support any other SSH Server (e.g. OpenSSH).
Faults:
(1).jttt uses a jtttt_port (in our
example, it's the listening port 9000) in the Intermediate Machine to
communicate to Client or Server. All the data exchanges through port 9000 is not secured. This includes:
1. The jttt_uesrname
and jttt_password you set (e.g. jie:xxxxxx)
2. The Public Key file
transmit from Intermediate to Server or Client
But this communication only exists in the
first few second when you launch the JTTT program in Client or Server. The
later communication is all through SSH.
(2).Currently use
port 22 to transmit SSH data (SSH's default port), we
don't support the way to configure it to other port numbers.
(3).In the
Intermediate Machine, you could use $INSTALL_DIR/bin/check.sh
to monitor the connections. But you can only do this via open another terminal
in Intermediate to launch this shell script. You can't do this in the running
JAVA terminal.
6.
The License Comments
jttt - Java TCP Tunneling Tool
http://sourceforge.net/projects/jttt/
Copyright
(C) 2003 Jeffrey Korn and Jie
C. Huang.
All Rights Reserved.
Written by: 2003 Jie C. Huang <jiechau@users.sourceforge.net>
This program is free software; you can
redistribute it and/or modify it under the terms of the GNU General Public
License as published by the Free Software Foundation; either version 2 of the
License, or (at your option) any later version.
This program is distributed in the hope
that it will be useful, but WITHOUT ANY WARRANTY; without even the implied
warranty of MERCHANTABILITY or FITNESS FOR A PARTICULAR PURPOSE. See the GNU General
Public License for more details.
You should have received a
copy of the GNU General Public License along with this program; if not, write
to the Free Software Foundation, Inc.,
The jttt Project
is written in JAVA and uses the J2SSH and Log4J libraries. Therefore:
"This product includes
software developed by the
SSHTools open
source projects (http://sourceforge.net/projects/sshtools/)."
"This product includes
software developed by the
Apache Software Foundation
(http://www.apache.org/)."
J2SSH is a package in project "SSHTools - Java SSH Solutions" which (UNIX name: sshtools) is a SourceForge.net project admin/develpoed by martianx and rpernavas. (http://sourceforge.net/projects/sshtools/)
![]()
Log4J is a project of "Apache
Jakarta Project" by The Apache Software Foundation.
(http://jakarta.apache.org/log4j/docs/index.html)
In order to simplify the process of
executing the command, I packed every ".class" files (including the jttt programs, the J2SSH library, and the Log4J library)
into one jar file, the jttt.jar file. All I was
trying to do was to simplify the process of executing the command, and nothing
else. You could use the "jar" (in J2SDK Standard Edition) command to
unpack this jar file. After the extraction, the J2SSH library is resided under
the path: com\sshtools\j2ssh\ and the Log4J library is resided under the path:
org\apache\commons\logging\.
7.
Contact Us
Developers:
jeffkorn
<jeffkorn@users.sourceforge.net>
jiechau
<jiechau@users.sourceforge.net>
Project Home Page:
http://sourceforge.net/projects/jttt/
This project is a
SourceForge.net project and is hosted on SourceForge.net:
http://sourceforge.net/