Design
of jttt - "Java TCP Tunneling Tool"
Date:
Developers
(user names in sourceforge.net)
jeffkorn
jiechau
Outline:
1. Introduction
2. Related work
3. The Project Design of jttt 1.0
4. The UML Design of jttt 1.0
5. Idea for future work: jttt 2.0
Appendix
A1. How to configure “Public Key Authentication” in SSH Server and Client
A2. Common setup for SSH Client Tools to do the Port Forwarding.
A3. How to use VNC software (RealVNC)
Reference
1. Introduction
TCP protocol [RFC 793] is widely used in the current internet. Most services we used in our daily life are on top of TCP protocol, e.g. the HTTP protocol for browsing www pages, the FTP protocol for file transfer, and RFB protocol ("remote framebuffer") for virtual network computing (used in so called “remote desktop software”). Some big issues about all these TCP services are: their data transferred in the wide internet is not secure (bytes stream, or actually, plain text data in bytes stream). And, when the local user network environment is inside a Firewall, some services can’t do the firewall penetration. These issues all limit the usage and convenience for TCP services.
Our project is to construct a network mechanism to enable the secure data transfer of these TCP service, and extend the usage of these TCP services between Firewalls.
We will use VNC software as our test TCP service. VNC software (www.realvnc.com) software is a remote control software which allows users to view and interact with one computer (the "Server") using a simple program (the "Viewer") on another computer anywhere on the Internet.
2.
Related works
Here is some basic domain knowledge/environment regarding our project:
(1). TCP/IP and Firewalling
Most functionalities about “Internet” we used in our daily life are those TCP services (on top of TCP Protocol, which is on top of IP Protocol), e.g. HTTP Protocol, TELNET Protocol, and SSH Protocol. The common feature of these “client-server” services is that the Server will listen on a specific TCP port, waiting for the Client to connect to. Once the connection is built, data is transmitted between a single TCP port (a socket) in Client and a single TCP port (the port which is listening) in Server. Based on the “Layer Structure” of TCP/IP protocol, the applications can communicate with each other no matter how you redirect/forwarding the transmitted data in the midway, only if you make sure the data finally goes to the right socket in the Server.
The Firewall functionalities provided by our LAN devices/administrators vary from environment to environment. “Generally speaking” our LAN router would inspect the Layer 3 IP header, and sometimes Layer 4 TCP (or UDP) header to determine whether a given packet is forwarded or dropped, which is called the Packet Filtering [Kurose 2002]. Thus it by default drops all outside-in traffic but allows certain kinds of inside-out traffic. Data transmission through SSH protocol (default TCP port 22) is always one of these certain kinds of allowed inside-out connection.
(2).Port Forwarding
In addition
to general TCP “Port Mapping” [
(3).SSH - “Secure Shell”
(i). About SSH:
SSH -“Secure Shell” is a program to login or to execute commands in another computer. It is intended as a replacement for telnet and those r-commands (e.g. rlogin, rsh, and rcp) because SSH provides strong authentication and secure communications over unsecure channels. SSH is a TCP service, which means it is a typical “client-server” TCP service (the SSH server default listens on port 22 for connection). There are two versions of Secure Shell available: SSH1 and SSH2. We will only use SSH2 in our project.
(ii).About the authentication methods:
SSH2 provides
3 authentication methods (not like TELNET protocol, there is only “password
authentication”). These methods are: Password authentication, Public Key
authentication, and Keyboard-interactive authentication. In this project, we
will only use the Public Key authentication method.
(iii).About the Protocol:
SSH uses the “Secure Shell Protocol”. The SSH Communications Security (http://www.ssh.com) is the developer of Secure Shell (secsh) Protocol and maintains the official releases of SSH1 and SSH2.
(iv).About the Tools:
The “SSH Secure Shell” (SECSH) is the SSH Communication Security's official release (implementation) of Secure Shell. Another famous unofficial implementations of SSH is OpenSSH (http://www.openssh.org). Both provide Server side and Client side tools. There are still some famous SSH Client software, like PuTTY, which is used for SSH Client to build connection to the SSH Server.
(v).About the Port Forwarding functionality provided by SSH:
SSH has Port Forwarding functionality. It simply encrypts your forwarding data through the SSH connection. Two terms associated to Port Forwarding provided by SSH. They are “Local Forwarding” and “Remote Forwarding” (please reference Appendix: “A2. Common setup for SSH Client Tools to do the Port Forwarding.” About how to implement Port Forwarding using SSH Clients):
Local Forwarding: Data which goes into your specific local port will be encrypted, passed through the SSH connection to the SSH server, then the SSH server decrypts these data and then forwards it to the desired remote port (in the a remote machine).
Remote Forwarding: Data which goes into a specific port in the SSH server will be encrypted, passed through SSH connection back to the local machine (the SSH Client), then the local SSH Client decrypts the data and forward to a desired port (in a remote machine).

(vi).More information, please reference:
http://www.onsight.com/faq/ssh/ssh-faq.html
http://www.ssh.com
http://www.openssh.com
http://www.ietf.org/ids.by.wg/secsh.html
http://www.chiark.greenend.org.uk/~sgtatham/putty
(4).JAVA2 SSH Tools API
SSHTools is a suite of Java applications providing both SSH client and server functionality as well as an extensible development library. JAVA programmer can include this library to performance SSH functions in the JAVA program. This library provides SSH functionality including SSH connection, SSH authentication (password, public key, and Keyboard-interactive), and SSH Port Forwarding.
More information, please reference:
http://www.sshtools.com/
http://sourceforge.net/projects/sshtools
(5).VNC
VNC stands for Virtual Network Computing. RealVNC (www.realvnc.com) is the official home of VNC, staffed by the original team who created and developed it whilst at AT&T. The VNC system is based on the concept of a remote framebuffer or RFB. RealVNC is a remote control software which allows you to view and interact with one computer (the "server") using a simple program (the "viewer") on another computer (Please reference Index: “A3. How to use VNC software (RealVNC)”).
VNC is a TCP service, which means the data transmission between VNC Client and VNC Server are on top of TCP/IP protocol.
More information, please reference:
http://www.realvnc.com
http://vega.lpl.arizona.edu/vnc_docs/protocol.html
http://vega.lpl.arizona.edu/vnc_docs/rfbproto.pdf
3. The
Project Design of jttt 1.0
In a nutshell, we want to do the Port Forwarding between 2 machines (our Client Machine and the Server Machine). While these 2 machines are resided inside their own Firewall, we need the 3rd Machine (the Intermediate Machine) as the intermediate. The Intermediate machine provides SSH authorization and SSH Port Forwarding functionality. You only need to have a user account in the Intermediate Machine then you could connect to the Intermediate Machine from Client Machine or Server Machine, and achieve the Port Forwarding Functionality at the same time when you build SSH connection.
You have only one user account in the Intermediate Machine, but the required Port Forwarding matches might be many (e.g. when you are required to forward Server_1:Port_1 to Client_1:Port_1, and Server_2:Port_2 to Client_2:Port_2, and so on and so forth). You could achieve all these Port Forwarding jobs via that same UNIX account in the Intermediate Machine. We use an authorization method named “jttt username/password” to distinguish different Server-Client Port Forwarding pairs. This “jttt username/password” is maintained in the Intermediate Machine and used for Client and Server Machines to do the authorization, retrieve the Private Keys, and use the retrieving Private Key to distinguish different Server-Client Port Forwarding pairs.
Here I will use the VNC software as a TCP service example to demonstrate the design of our project, jttt – Java TCP Tunneling Tool version 1.0.
(1).The Design: modify the VNC software setting
Our goal is to design a TCP port forwarding mechanism and apply it on the VNC software (a typical client-server TCP service, so the same method can applied on other TCP services, e.g. HTTP, TELNET, … etc.). The basic idea is to modify the VNC software setting to let it match our TCP port forwarding mechanism. First we talk about how to modify the VNC software setting.
Normal VNC connection (as well as any other TCP service connection) is built when both Client and Server is exposed in the public Internet. Sometimes even the Client resides inside a firewall (Under the “common” firewall environment as mentioned in previous chapter) the TCP connection can be built without any limitation. Data without any encryption is transmitted through a direct connection. This situation is illustrated as following diagram:

But when the Server is resided inside a firewall, we need an Intermediate Machine to be the gateway between VNC Client and VNC Server. Regardless the Intermediate Machine, we now let the VNC Client connect to its local port 5900 (instead of connecting to remote VNC Server) as if there is a pseudo VNC Server installed on its own machine listening on local port 5900. Then the remaining problem is “how to transmit data from VNC Client port 5900 to the VNC Server port 5900, when both Client and Server is inside firewalls”.

The method about how to transmit data from VNC Client port 5900 to the VNC Server port 5900 is mentioned below.
(2).The Design: TCP port forwarding mechanism
We use SSH
connection, letting both VNC Client and VNC Server connect to an Intermediate
Machine, to achieve the TCP port forwarding, firewall penetration, and
encryption of transmitted data.
The idea is,
the Intermediate machine is running SSH server, listening on port 22, and both
VNC Client and VNC Server have SSH client tool/application to be used to build
SSH connection to the Intermediate Machine. We first build SSH connection from
VNC Client to the Intermediate Machine. Via the port forwarding functionality
provided by SSH connection, we can forward the data in VNC Client port 5900 to
a specific port (say, port 9001) on the Intermediate Machine. Then we build SSH
connection from VNC Server to the Intermediate Machine. Again, via the port
forwarding functionality provided by SSH connection, we can forward the data in
Intermediate Machine port 9001 back to VNC Server port 5900. Under this
scenario, both VNC Client and VNC Server can be resided inside firewalls, and the
forwarding data is encrypted. Once these tunnels are built, the application
level connection from VNC Client to its local port 5900 (mentioned in previous
“The Design: modify the VNC software setting”) is actually a connection to
Notice that under this scenario the Intermediate Machine should reside in a public Internet address (or at least where both VNC Client and Server can connect to). The whole scenario is illustrated as follow:

(3).The Design: Management of user session
When we build SSH connection from VNC Client (or VNC Server) to the Intermediate Machine, we use the “Public Key authentication method” (associated to a valid user account in Intermediate Machine) provided by SSH protocol. If there are lots of requests (e.g. many different VNC Client/Server connection pairs through a same Intermediate Machine), we can’t just create a new user account in the Intermediate Machine for each connection pair. Thus we need a mechanism to manage those connections.
Here we use the “Forced Command” feature in SSH protocol to solve it. We still use only one user account in the Intermediate Machine to handle all the SSH connection requests, but give different public key pair to different VNC Client/Server pair, with different public key associated to different “Forced Command”. The Forced command is actually to run a small Shell script in the Intermediate Machine, named “keepAlive.sh” with arguments indicated the different VNC Client/Server pair and different port for forwarding (start from port 9001 for each pair). The remaining problem is how to deliver the “authenticated key” to VNC Client and VNC Server.
Since there
is only one account used for SSH connection in the Intermediate Machine, we
need a username/password data sheet to distinguish different Client/Server
pair. We call it “jttt username/password”. For every
user who has the access to use this port forwarding mechanism, we assign a
specific jttt username/password to him/her. And in
the Intermediate Machine we run a program to do the authentication of “jttt username/password” job (it is the “Intermediate.java”
program in our implementation, see next chapter) and deliver the “Private Key”
to user when authenticated. When a user wants to build the connection, he first
uses the “jttt username/password” to access the
Intermediate Machine. After authenticated, the Intermediate Machine will assign
a Private Key to user and register associated data (e.g. Forced Command, the

(4).Software/Tools used.
The VNC software:
The software to demonstrate the TCP service, installed in server and client.
http://www.realvnc.com
SECSH (SSH Secure Shell) or OpenSSH:
The SSH server tool installed in the Intermediate machine, for both client and server to connect to. In the jttt 1.0 release, we plan to use SECSH only. The further release will support OpenSSH.
http://www.openssh.org
JAVA2 SSH Tools:
The SSH client tool library (API) in JAVA programming language. This library is used to perform the SSH Client functionality in both VNC Client and Server side.
http://sourceforge.net/projects/sshtools
Korn Shell:
Used to write the keepAlive.sh scripts in the Intermediate machine.
http://www.cs.princeton.edu/~jlk/kornshell/doc/man93.html
(5). The Implementation
The Port Forward mechanism:
The Port Forward mechanism is achieved via running the associated JAVA programs and SSH protocol in the Intermediate Machine, in the VNC Client, and in the VNC Server, illustrate as follow:

Intermediate Machine:
Intermediate Machine runs:
(i). The SSH server
(ii). A JAVA program Intermediate.java.
(iii). A Shell Script “keepAlive.sh”
SSH server is used for the SSH connection and port forward functionality, while Intermediate.java is used to manage the connection requests and transmit the private key to the SSH client.
We use sparky.cs.nyu.edu as the Intermediate Machine. It runs Intermediate.java to listen on port:9000. Once there is a connection request (either from VNC Server or Client). It will do the user authentication first (use the jttt username/password), then assigns a port number (start from 9001) and picks up a key pair, transmit the SSH private key, and modify the SSH configuration file for the authentication of that key, and then close the connection.
After this procedure, the SSH Client can use this Private Key to connect to Intermediate Machine later. When the SSH Client get connection, it will invoke a 'Forced Command' (instead of a shell) in the Intermediate Machine. The keepAlive.sh update a data file mentioning the state of this SSH connection and port forwarding data (user, port), so when the Intermediate machine doing the 'check user session' work, it won't be cleaned.
The Intermediate.java has a Thread named “CheckSession” (an inner class: Intermediate$CheckSession.class), which is doing the works of checking the quantity of prepared Key pairs, and checking the user sessions (if alive). It will check the data file modified by keepAlive.sh to see if a user session is still available.
VNC Server Side:
VNC Server has these programs prepared:
(i). JTTT.java (our main program)
(ii). TCPClient.java (used by JTTT.java)
(iii). Forwarding.java (used by JTTT.java)
(iv). Echoing.java (used by JTTT.java)
(v). Java SSH Tools API (used by Forwarding.java and Echoing.java)
(vi). VNC software - server side
program (our test TCP service)
The VNC Server starts from running the JTTT.java (it will later invoke the other JAVA programs). It first tries to connect to Intermediate machine port:9000 to do the jttt username/password authentication. If authenticated, it can retrieve a Private Key from Intermediate Machine and the TCP connection is closed. Then it will invoke the port forward method (in TCPClient.java and Forwarding.java) to get SSH connection to the Intermediate machine using that Private Key. Once the port forwarding function is activated, another class named Echoing.java will invoke a shell program (keepAlive.sh) in the Intermediate Machine. The keepAlive.sh update a data file mentioning the state of this SSH connection and port forwarding data (username, port), so when the Intermediate machine doing the 'check user session' work, it won't be cleaned.
As our example, we use a desktop PC running on Microsoft Windows XP as the VNC Server. When JTTT.java keeps on running, there is a connection to the Intermediate Machine and the Port Forwarding function is activated:
After setting
up the TCP port forwarding function, you can launch the VNC Server Application,
configure it to match the
VNC Client Side:
VNC Client has these programs prepared:
(i). JTTT.java (our main program)
(ii). TCPClient.java (used by JTTT.java)
(iii). Forwarding.java (used by JTTT.java)
(iv). Echoing.java (used by JTTT.java)
(v). Java SSH
Tools API (used by Forwarding.java and Echoing.java)
(vi). VNC software – client side
viewer program (our test TCP service)
JTTT.java in Client works exactly the same way as JTTT.java in Server except it does a Local Port Forwarding instead of Remote Forwarding.
After running JTTT.java, then we can launch the VNC Client software, set up to match the port forwarding function we just done. Then it will invoke the application to show the remote desktop:
4.
The UML Design of jttt 1.0
These diagrams are done by Poseidon for UML community version 1.6. The diagrams here are not clear due to the layout of this document. You could download all these design diagrams and a jttt UML design project file in our downloading area:
http://sourceforge.net/project/showfiles.php?group_id=83673
(1). Use Case of jttt 1.0

(2). “jttt authentication and get SSH Private Key” activity:

(3). “SSH authentication and Port Forwarding” activity:

(4). “check user session” activity:

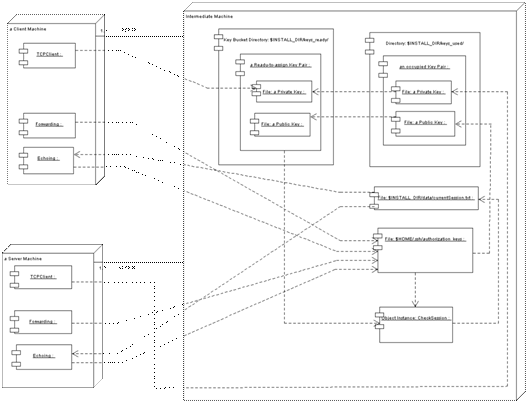
(5). The Classes used in the Intermediate Machine:

(6). The Classes used in the Client and Server Machine:

(7). The Deployment diagram:
5. Idea
for future work: jttt 2.0
The current version uses JAVA application (wish JAVA 2 SSH Tools API) to do the SSH authentication for both client and server to the intermediate machine. This way the client and server need to run this JAVA application manually. We wish to turn this Java application into an Applet JAR file. With a simple Web Server Service (in the intermediate machine) the user, both client and server side, can easily launch the JAVA Applet in their browser. This way the user side doesn’t need to keep any application JAVA .class files, and with the Applet GUI interface the, it would be more convenient for the user to set up and execute the whole mechanism.
When we turn our JAVA program into Applet, we can also modify the current mechanism of the authentication method to the SSH server in intermediate machine. Right now we use “Public Key authentication” in SSH, and the SSH server deliveries the private keys to users by using a TCP program (port:9000), for the user to download the private key (via jttt username/password). We can combine the delivery key method when we construct the JAVA Applet. There are 2 possible way to do so:
(1). Modification 1: Put the private key in the JAR file
We could pack the private key and the JAVA program into a single .jar file. When the user launch the Applet, download it from the server, he/she downloads the private key in the same time. The key point is: “how to let the JAVA program to read the private file which is packed inside a JAR file?” A possible solution is to find out the associated method (from native JAVA API) which can “read a file content, while this file is packed in a JAR file”. Or, we can make this private key data into a java class (an object having a field/interface whose value is the private key data, or a serializable object). But doing things this way, we will need our Web server to dynamically compile the .java file to .class and pack it into a customized .jar file, before a user download this jar file.
(2). Modification 2: Make the private key a parameter to the JAR file
Another possible solution is to make the private key a parameter to the Applet. The way we don’t need to pack the private key file into the Applet JAR but the challenge falls on “how to pass the private key content to the user?” A possible solution is to generate the dynamic web page (with different private key content as the Applet parameter) for each user. The good thing is: this way we don’t need to dynamically generate a “customized JAR file”. To be compared, a dynamic web page is more general (and easier to implement) than a dynamic JAR file. There are still some other important issues to this solution like “Would the private key content excess the available value length of an Applet parameter?” This is also crucial to this solution.
Appendix
A1. How to configure “Public Key Authentication” in SSH Server and Client
You should create a pair a authentication key first, keep the “Private Key” in your SSH Client, and the “Public Key” in your SSH Server. Then configure your SSH Client and Server setting to recognize and use this key when you do the authentication.
(1).Prepare your authentication keys first
In the following example, I’ll use OpenSSH, SSH Secure Shell and PuTTY as ssh key generation tools. After the key generation procedure you will have a Public Key and Private Key. I’ll use the file “mykey” to store the Private Key and “mykey.pub” to store the Pubic Key in all these 3 example key generation tools.
(i).use OpenSSH
You could use the commands as follows to generate a 1024 bits key par using RSA or DSA algorithm. The generated private key is named “mykey”, and the public key is “mykey.pub”, all under the current directory:
% ssh-keygen -t dsa -b 1024 -f mykey
% ssh-keygen -t rsa -b 1024 -f mykey
(ii). use SSH Secure Shell
You could use the commands as follows to generate a 1024 bits key par using RSA or DSA algorithm. The generated private key is named “mykey”, and the public key is “mykey.pub”, all under the current directory:
% ssh-keygen2 -t dsa -b 1024 mykey
% ssh-keygen2 -t rsa -b 1024 mykey
(iii). use PuTTY
Run the GUI
application named “puttygen.exe” (should be in the same directory as
putty.exe). There you could assign the key algorithm, numbers of bits of the
key, and simply click “Generate” to do that. Remember to move your mouse all
the time when it is generating the key.
(2).Configure SSH Server to allow “Public Key Authentication”
(i). OpenSSH Server
Server setting:
In the SSH daemon configuration file (default in /etc/ssh/sshd_config) you could add this line to allow Public Key Authentication in SSH2. If you don’t specify this value, it is “yes” (to allow Public Key Authentication) by default:
PubkeyAuthentication yes
User account setting:
Then you should set up your user account to allow Public Key authentication. This is done by copying the public key content (in our example, it’s the content of “mykey.pub”) to the file $HOME/.ssh/authorized_keys. In this file, every line is a public key, for example, here is a sample content:
ssh-dss AAAAB3Nxxx....
Where ``ssh-dss'', or ``ssh-rsa'' denotes key types of DSA or RSA, the following AAAAB3Nxxx is the content of public key file (in our example, the whole content of mykey.pub file, except the “#” command lines). If we further apply “Forced Command” function on this key, the format would be:
command="echo hi" ssh-dss AAAAB3Nxxx....
(ii). SSH Secure Shell Server
Server setting:
In the SSH daemon configuration file (default in /etc/ssh2/sshd_config) you could add “publickey“ option to the “AllowedAuthentications” field. This is to allow Public Key Authentication in SSH2. If you don’t specify this value, by default it is “yes” (to allow Public Key Authentication):
AllowedAuthentications hostbased,publickey,password
User account setting:
Then you should set up your user account to allow Public Key authentication. This is done by keeping the public key (in our example, it’s “mykey.pub”) under the directory $HOME/.ssh2/. For example, if the user account is “jch280” and the default home directory of this account is /home/jch280 then the public key should be in /home/jch280/.ssh2/mykey.pub.
Then you should edit the file “authorization” ($HOME/.ssh2/authorization) to let the sshd recognize the public key you specified. This is done by adding these 2 lines into “authorization” file:
Key mykey.pub
Command “echo hi”
where “mykey.pub”
could be an absolute path of the public key file, and the line “Command” is
called Forced Command in SSH Server. This means that when user use this pair of
key to authenticate, instead of having a shell to use, he can only execute the
command issued in the “Command” line (like above example, it’s only a echo
message then logout). If this “Command” line is omitted, by default he will
have a shell to use.
(3).Configure SSH Client to use “Public Key Authentication”
Here we introduce how to use SSH Clients to connect to a SSH Server using Public Key authentication:
(i). OpenSSH SSH Client
If you use OpenSSH Client (the tool: ssh) and you store the Private Key in this location /home/jlk/data/mykey, you could use this command to connect to SSH server: sparky.cs.nyu.edu, using the user account “jch280” and use the key file “mykey”:
% ssh -2 -l
jch280 -i /home/jlk/data/mykey
sparky.cs.nyu.edu -v
The extra option “-2” denotes to use SSH2 protocol to connect, “-v” is verbose mode which is useful to trace error.
(ii). SSH Secure Shell SSH Client
If you use SSH Secure Shell, the client command is the same as OpenSSH except it doesn’t accept the -2 argument:
% ssh2 -l jch280 -i /home/jlk/data/mykey sparky.cs.nyu.edu -v
(ii). PuTTY SSH Client
You could do this by starting create a “Session Profile” in PuTTY first, let’s call it ”vnc client 0”. Then Click on the “Auth” (under “Connection” -> “SSH” in the left hand side menu). By checking “Browse…” you could give it a Private Key file. Notice that the PuTTY SSH Client only accept the Private Key file in its own format (which is in .PPK file extension). If you use a private key generated somewhere else (by some other key generation tool other than puttygen.exe) you should use the “puttygen.exe” application to convert to key to the PuTTY format. Finally, remember to go back to “Session” to save this setting associated to the “vnc client 0” session profile.

A2. Common setup for SSH Client Tools to do the Port Forwarding.
Here we introduce 3 common SSH Client Tools to achieve SSH Port Forwarding function. They are “OpenSSH”, “SSH Secure Shell” and “PuTTY”.
(1).Use “OpenSSH” or “SSH Secure Shell” SSH Client (under UNIX operating system)
For the “Local Forwarding”, suppose you wish to connection to a machine: “sparky.cs.nyu.edu” with the user account “jch280”, and do the Port Forwarding as: Forward all data which goes into local port 5900 (in you local machine) to port 9001 in sparky.cs.nyu.edu. You can use the follow command:
In OpenSSH:
% ssh -L 5900:localhost:9001 -l jch280 sparky.cs.nyu.edu
In SSH Secure Shell:
% ssh2 -L 5900:localhost:9001 jch280@sparky.cs.nyu.edu
For the “Remote Forwarding”, suppose you wish to connection to a machine: “sparky.cs.nyu.edu” with the user account “jch280”, and do the Port Forwarding as: Forward all data which goes into port 9001 in sparky to you local port 5900 in you local machine. You can use the follow command:
In OpenSSH:
% ssh -R 5900:localhost:9001 -l jch280 sparky.cs.nyu.edu
In SSH Secure Shell:
% ssh2 -R 5900:localhost:9001 jch280@sparky.cs.nyu.edu
For more information, please reference:
http://www.openbsd.org/cgi-bin/man.cgi?query=ssh
http://www.ssh.com/support/documentation/online/ssh/adminguide/24/Port_Forwarding.html
(2).Use PuTTY SSH Client Tool (under Microsoft Windows operation system)
For the “Local Forwarding”:
Suppose you wish to connection to a machine: “sparky.cs.nyu.edu” with the user account “jch280”, and do the Port Forwarding as: Forward all data which goes into local port 5900 in you local machine to port 9001 in sparky.cs.nyu.edu. You could do this by starting create a “Session Profile” in PuTTY, let’s call it ”vnc client 0”. Then Click on the “Tunnels” (under “Connection” -> “SSH”) in the left hand side menu. Check “Local ports accept connection from other hosts” and input the associated Port Forwarding data. Remember to check the “Local” in the bottom to indicate that this is a “Local Forwarding” setting:

Click “Add” to complete then you could see the forwarding rule is added in the “Forwarded ports:” box, like “L9001 localhost:5900”. Then it’s done. When you finish the setting, don’t forget to go back the “Session” to save this Session Profile (“vnc client 0”) by simply click the “Save”. Then you could click “Open” to launch this connection. PuTTY will ask you the username and password. You can use the user account (jch280) with its password to do the authentication. After the connection is built, the tunnel of Port forwarding is built in the same time. You could test your Forwarding setting by open a command prompt windows and try to “telnet localhost 5900”, see if the connect is redirected to “sparky.cs.nyu.edu port 9001”.
For the “Remote Forwarding”:
Suppose you wish to connection to a machine: “sparky.cs.nyu.edu” with the user account “jch280”, and do the Port Forwarding as: Forward all data which goes into port 9001 in sparky.cs.nyu.edu back to you local port 5900 in you local machine. You could do this by starting create a “Session Profile” in PuTTY, let’s call it”vnc server 0”. Then click on the “Tunnels” (under “Connection” -> “SSH”) in the left hand side menu. Check “Remote Ports do the same [SSH2 only]” and input the associated Port Forwarding data. Remember to check the “Remote” in the bottom to indicate that this is a “Remote Forwarding” setting:

Click “Add” to complete. Then you could see the forwarding rule is added in the “Forwarded ports:” box, like “R9001 localhost:5900”. Then it’s done. When you finish the setting, don’t forget to go back the “Session” to save this Session Profile (“vnc server 0”) by simply click the “Save”. Then you could click “Open” to launch this connection. PuTTY will launch a connection window and ask you the username and password, and it’s done.
You could test your Forwarding setting by open a command prompt windows and try to “telnet sparky.cs.nyu.edu 9001”, see if the connect is redirected to “localhost port 5900”.
For more information, please reference:
http://the.earth.li/~sgtatham/putty/0.53b/htmldoc/
There are many SSH Clients which can achieve the same functionality of “Local Forwarding” and “Remote Forwarding”. For more information, please reference:
http://www.oreillynet.com/pub/a/wireless/2001/02/23/wep.html
A3. How to use VNC software (RealVNC)
You could
download VNC software (both server and viewer) from the web site of VNC (http://www.vnc.com).
There are also many other VNC software modification versions providing exactly
the same functionality but having some revisal like the transmitted data
encoding algorithm, for example TightVNC,
http://www.TightVNC.com, is one of them. You could choose any one of them. Here
we use RealVNC as example to demo how to setup basic
VNC server and viewer.
(1).The VNC Server
Simply download the VNC software from the VNC web site, install it. Then you could run the VNC Server by Launch the program. Remember to assign a password to you VNC Server. In the VNC property configuration, you could assign the “display number”. A display number of “0” means the server is listening on port 5900, and “1” means on port 5901, so on and so forth. This setting information is important for the VNC Client to connect to (and also important to our project implement).

Notice that, if you install the VNC Server in the Microsoft Windows, by default it doesn’t allow you to do the loopback, which mean you can’t use another VNC viewer to connect back to a localhost VNC Server. This conflicts our goal of apply SSH tunneling in the VNC application. So you need to edit the register key in Windwos (simply by run the regedit.exe program). Add the following register key “AllowLoopback” under the directory:
HKEY_LOCAL_MACHINE\Software\ORL\WinVNC3\
AllowLoopback is “Dword” type and you should set its value to 1. If you are using a VNC Server in UNIX operating system, then you don’t need to worry about this, by default it allows loopback connection. If you use some other modification of VNC software (e.g. TightVNC from http://www.tightvnc.com/) then there is an advanced setting to let you assign the local loopback functionality. This way you don’t need to edit the Windows Registry.

(2).The VNC Client (the Viewer)
Simply download the VNC software from the VNC web site, install it. Then you could run the VNC Client by Launch the viewer program. First it will ask you the address (of VNC Server) to connect to. The format to input is “address:display_number” where “address” is the Hostname or IP Address of your VNC Server, and “display_number” denotes to the display you set in the VNC number. Then you will be asked to type the VNC Server password to verify.
This is an example to connect a VNC Server (whose IP Address is 162.83.148.200, and the VNC Server software there is set to display “0”, which means the VNC Server is listening in Port 5900):

In our jttt project, we redirect the TCP connection via SSH Port Forwarding functionality. If you run jttt application and set up the data in localhost Port:5900 in Client Machine to be forward to Intermediate Machine, then when you launch the VNC viewer program, the input form would be look like this:

For more information, please reference:
http://www.uk.research.att.com/vnc/winvnc.html
Reference
[
[Kurose 2002] James F. Kurose, Keith W. Ross, James Kurose, Keith Ross,
“Computer Networking: A Top-Down Approach Featuring the Internet”, 2nd edition,
Addison-Wesley Publishing,
[Painter 2002] Lee David Painter, Richard Pernavas, "SSHTools - Java SSH Solutions", Open source software project registered in SourceForge.net on 2002-08-24.
http://sourceforge.net/projects/sshtools
[RFC 793] Jon Postel, “Transmission Control Protocol”, RFC 793, September 1981.
http://www.ietf.org/rfc/rfc0793.txt?number=793
jttt is an independent research
project admin/develpoed by jeffkorn
and jiechau and is hosted on SourceForge.net: http://sourceforge.net/projects/jttt/